Lessons learned from food storage

Storing food long term is not easy.  There are many things that will go wrong and ruin the things you saved, it’s so aggravating to pack then away only to find a big mess later.  Here’s a list of things I’ve found that help the process:

  1. Always use Ziploc bags on EVERYTHING.

It doesn’t seem to matter what you are storing, it will be affected by moisture in some way. Putting each group of like items or individual item in Ziplocks keeps moisture out, prevents odors from permeating packages, and keeps any packaging failure localized. I’ve had things rupture and ruin an entire 20 gallon Tupperware bin, bagging it would have stopped that from happening.  This is addition to a Tupperware bin, or cases of #10 cans in boxes.  Put one of the 20 gallon bags around any cardboard boxes, as they will absorb moisture and deteriorate.

2.  Don’t rely on desiccants, and NEVER use Damp-rid!

I made a few mistakes early on, the biggest was using Damp-rid inside containers. That stuff turns into a soupy mess of water and is highly corrosive. It ends up putting pools of water in your storage bin, which is exactly what you didn’t want. It’s far better to seal everything, and try to store in a low humidity environment. Silica gel may work, but I suspect it also gets saturated.

3. Be very careful with canned goods.

I have had soup rust through from the inside in only a few years, modern cans are not the same as the old tin plated soldered versions. People claim canned food will last decades, but that has not been my experience. I have no canned good in my storage as a result, it’s all dry mix.

4. Don’t store flour or corn meal unless there is no alternative.

They have very short shelf life, and can be made up from canned popcorn and wheat berries.  You could repack flours, but the taste and nutritional value is just not there.

5.  Buy items packed in metal cans or glass jugs/jars whenever possible.

Believe it when people say plastic is permeable. Same goes for paper, foil,  or cardboard. It doesn’t seem hold up to storage and picks up funky smells.  Many staples can be purchased in cans, from places like Emergency Essentials or Rainy Day Foods.  I switched over to cans on dried corn, baking powder/soda, cocoa, sugar, powered milk, drink and soup mixes, and spices. I got really tired of replacing stock. Example: I had a brand new plastic bottle of aspirin stored, the pills started growing whiskers and clumping together. I can only assume this was moisture getting in, but in any case it didn’t hold up.

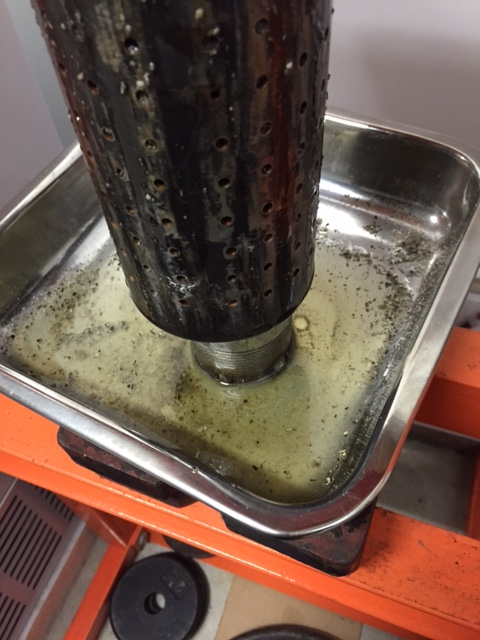
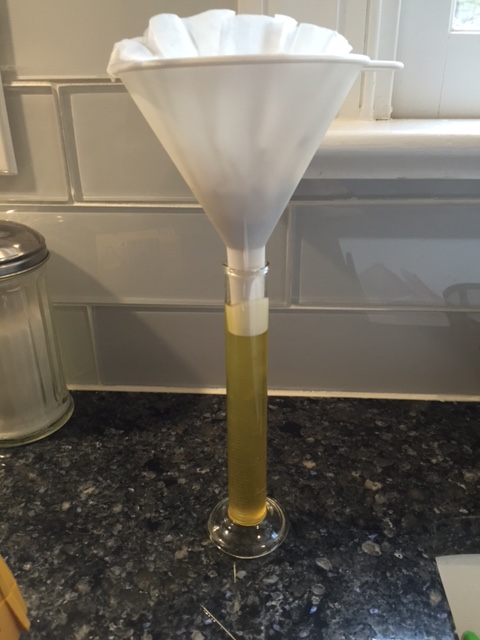
6.  Buy powder vs liquid.

This is a shelf life and volume issue, the powders weight less and seem to keep longer than liquid versions.

Results of the 2018 storage check

It’s that time again, it’s already been close to 5 years since I last cycled through the mid-term storage items.  I had checked my boxed up freeze dried stuff back in 2016, but I didn’t do a detailed check of the bins where I save the grocery store type stuff. Here’s the highlights:

  • Kool Aid packets. Fail. They picked up up moisture and formed a puck inside the packets, plus they changed color and got some green specks which I’m pretty sure aren’t flavor crystals. These may have been from 2005, so I can give them a pass but they don’t last all that long sitting around.
  • Gel deodorant. Fail. Turned into liquid, thankfully they stayed sealed.  Same thing, 2005 vintage, but I’m going to solid stick now.
  • House brand liquid dish soap. Win. Perfect, from 2005.
  • Book matches, 1000. Win. Had rusty staples but struck like new. 2005.
  • Flour and corn meal.  Fail.  Picked up moisture and odors from other items. 2013.
  • Sugar (bag). Fail. Moisture on the bottom of the sack. 2013. Guess it’s hygroscopic.
  • Peanut butter. Win.  Looks and smells perfect, 2013. This will go back into storage until 2022, it will get pitched then. I pick up 4 huge jars every 4 years.
  • Oil. Win. Looks and smells perfect, 2013. Same as the PB, 8 year life. 
  • Yeast packets. Win.  Looked and smelled great, and proofed just fine. 2005. I’ve since switched to glass jars, but the packets held up. A big surprise, everyone claims they go bad but apparently not.
  • Aspirin. Fail. The pills had crystal whiskers growing out of them, and were clumping together, 2005 . I figured aspirin would last for decades, guess not.

Funny how many things go bad after a few years, even when you try to keep them in a favorable environment. This is one of the things apocalypse movies get wrong, things just don’t last.


Filling in the preparedness plan gaps

I’m sort of done with the big picture planning, and now I’m going back to see what sort of gaps exist in my 1 year plan. I did this by creating a master Excel sheet with every plan item listed, with the quantity/storage location/justification for the amount. Once I did that, it was apparent which things were either missing or short. For instance, I had toiletries and hygiene items but had missed on the amounts and type.  Toothpaste and floss was short, and the wrong type (need powder for long term storage). Toilet paper was another. Once you get it all on paper, you can mentally run through everything you use regularly and see the issues. Calculating your usage is a must, and can be done within the sheet which is handy. One thing that tripped me up is my kid’s needs, when I first started they were preschool/elementary age but now are teenagers. That add two adults to the list, with different needs.

I am getting close to finishing up the 1 year prep plan, most things are in place and it’s a good feeling.  There is the question of how long to plan for, there’s nothing magic about a year but LDS uses it and it is a reasonable time frame.  Anything longer than that would either have to be dealt with by going full homesteader or going nuts on the amount of stored items. I just can’t see a reasonable scenario where I’d need 3 or 5 years with no outside supply or ability to grow food.

As a note, it’s time again to purge and check stock on my 2005 and 2013 items. I had socked away some things long ago that weren’t really meant to last, but they seemed to hold up OK externally. I’ll be sampling things and reporting back, stay tuned for that….


100% Wheat and Rye Bread, another success!

I’ve been on a bread making binge lately, the cold weather was conducive to hanging out inside and running the oven. I got 5 lb bags of hard red wheat and rye berries, and ground those into flour using the same superfine feed rate setting. Based on the last results, I decided to use double the salt (counters the bland taste) and then let each type rise twice before the punchdown and final rise.  Here’s the loaves:

Wheat

YES!!! I finally got the desired rise, it was perfect and didn’t collapse.  I used small loaf pans, that may help (they are about 1/2 size in all dimensions, and dark for best browning). You can see the nice light structure, it made a big difference to get the second rise and slow down the process. I originally thought one rise for the whole grains, but that seems to lead to the top collapsing.  On to the rye…

Rye

I milled my own flour versus using stale, coarse rye from the store.  The store flour seems to be used to make “rye-taste” bread, with lots of white flour for the rise.  It doesn’t work at all for bread IMO. This rye dough was pretty thin at first, it’s too sticky for a bread machine unless you had something that was round and a rubber paddle to pick up all the dough. And there’s be no point in kneading it extensively as there’s no gluten.  I used the same mini pans, lots of water and salt, with two risings. The rises took over 3 hours (total time), but it was worth the wait.

IMG_2504

They rose picture-perfect, then sagged a bit in the oven (grrrrr). But, as you can see from the interior it has a nice shaggy texture and not too dense. A couple of notes on the 100% rye:

  • The interior is gummy when first baked. You want to let the loaves cool and sit a day before eating it, it’s good but needs that time to develop the texture. I’ve seen references to this elsewhere, seems odd but that’s the rye I suppose.
  • The flavor is stronger than wheat, not bad but you probably have to like Rye Krisp to enjoy it. It mellows with time, I bag my bread in the fridge and that seems to work well to develop the taste. I make toast in the mornings with my experiments, and have been savoring the rye, more so than the wheat.


Cooking with 100% Sorghum flour

I promised to make something out of the excess sorghum seeds, so I used my grain mill to make flour. I set it on fine/slow, and ran a cup of seed through:

Sorghum seed

IMG_2472

The end result

IMG_2471
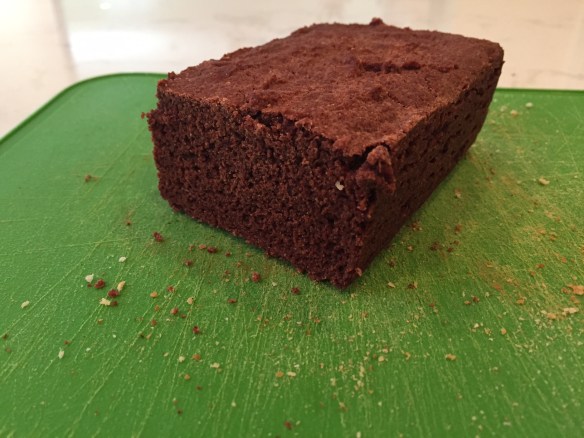
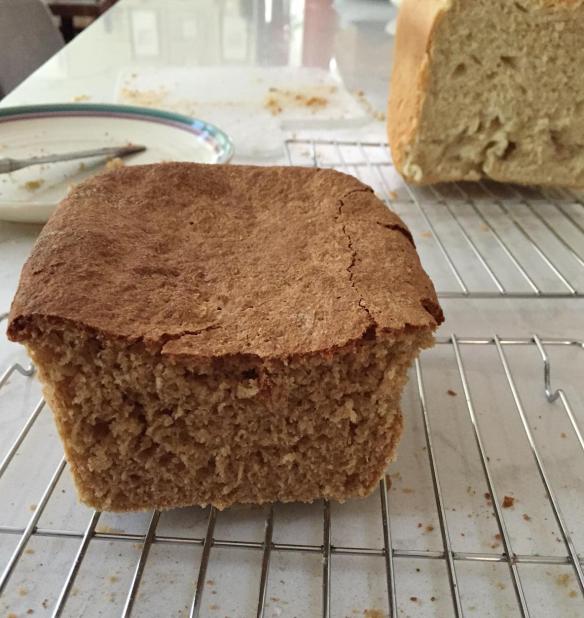
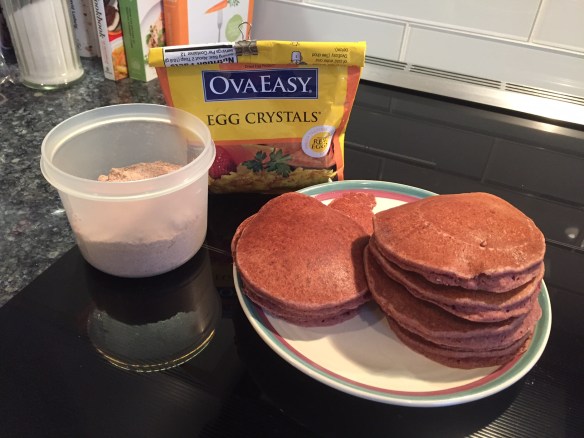
The flour is on the left, it looks EXACTLY like thermite incendiary powder (it’s a very weird pink color). I used whole wheat pancake recipe as a basis, and they turned out perfect. The flour gives everything an unusual nutty flavor, it’s not bad just takes getting used to. In fact, it was sort of compelling and we ate all them all up.   Here’s the bread I made with the leftover flour, and with the same 100% wheat process (lots of water):

IMG_2473

Looks just like pumpernickel! Has that smokey nutty taste, and is a bit crumbly due to lack of any gluten. It is pretty tasty with peanut butter, which complemented the sorghum flavor.   My daughter though it was a big brownie and got a big surprise when she tried scarfing it down when no one was looking.  Haha, serves her right for being a pig.

I think this would be good as a muffin, with some syrup mixed in. I may try that soon, seeing how the sorghum syrup is like molasses.


Wheat Bread Victory

Hooray, I finally made a loaf of 100% wheat bread that was tasty and everyone chowed down on. The trick was (as I mentioned earlier) to use whole berries, grind them as fine as the machine will go, use 50% more water than recipes call for, and bake at 400 vs 350.

Exhibit A

img_2145

Nice crumb, hard crust, not dense. The white load behind it is from a bread machine, it’s like candy and the family eats it up as soon as it comes out of the machine.

The next big thing will be to try sourdough, in a crisis yeast will not be available so it’s a must. It is said the sourdough yeast works a lot better in whole wheat than the packaged variety, and you can make a firmer loaf that self supports (boule). I have the starter direction, will give that a whirl over the next few weeks.

Wheat Pancakes

I had a cup of flour left over from bread making, so I made whole wheat pancakes.  They were very good, my wife and son loved them but D2 wee’d on them. Figures, she hates anything whole grain.  They look and prepare the same as Bisquick versions, they have a little more of a wheat flavor but otherwise taste great. I didn’t know how the hard wheat would work in self-rising goods, turns out pretty well. I have the soft wheat berries but haven’t done anything with it, I’m not planning on that sort of refinement in my wheat farming.

Stay tuned for Operation Sourdough, that’s in the pipeline.


Breakfast in America (freeze dried)

I finally got around to trying powdered eggs. I’ve been meaning to do this for a long time, and got a bit of time to experiment.  I’d always heard powdered eggs were bad, and I see why. To start, I bought a #10 can of Scrambled Egg Mix from BePrepared. I followed the instructions, made a small batch that looked great but tasted nasty. I can’t really say what specifically makes it bad, maybe salt but it’s just this weird unnatural flavor combined with a rubbery texture. I tried using less water to combat the latter, and it improved things but only marginally. It went from vile to “no seconds for me, thanks”.  It was like a dry Egg McMuffin egg portion, puck like but oddly far more edible. You could make a sandwich out of it and it would be OK.

The Contenders

img_2150

I read some Amazon reviews of powdered eggs, and the consensus was “Ovaeasy” is the best. Got a small packet of those, and yes we have a winner.  They are very close to real eggs in taste and texture, and pretty good to eat. I fed some to my wife, who said “I’d eat them if I was starving” which means they were OK. I finished the whole portion, which I could not do with the other product.  Glad I didn’t buy a lot of those!

Speaking of breakfast, I also tried the Mountain Home Bacon and Eggs in a pouch. That was fair, I ate it but it’s not quite as good as Ovaeasy. It’s way easier to prepare, no dishes or fooling with whisks and pans.

Spring update

It’s been a busy spring, not much time to post and just working on getting all the plants pruned/in/maintained.  I have two gardens, one at work and one at work so they’ve kept me hopping. I’m still on the path of planting all the various crops I’d need, and then getting them to yield and produce seed for the next season. And figuring out how to store and process them.

Here’s the highlights:

Berries

I have blueberries, raspberries, and blackberries all in big pots. This is working well so far,  the only difficulties are keeping them watered in the summer and protecting them from pests. Everything else is well-documented on the web, the need for fertilizer and pruning, and various diseases (all which I’ve encountered).  The pests are a big issue, I had to build a wood frame with plastic bird mesh to keep the catbirds out. They take every single mature blue and blackberry, but don’t seem to care about raspberries. That worked for the birds, but I had squirrels wiggle under the mesh and trample one of plant’s canes.  I added a 48″ fence, but they raised that up and did it again, unbelievably. So, they had to go the hard way which I’ll leave to the imagination.  The far left plant has yellow leaves due to the broken canes, grrrrrr…If you look closely, you can make out the black mesh but it’s nearly invisible.

Berrypatch

Since using fruit fertilizer, all the plants have borne a heavy crop of berries and I’ve been able to eat them every day as well as freeze enough for cobblers. It is very satisfying, and I’d say if I had room for nothing else I’d grow berries.

Potatoes

Recall I had a few fall plants growing from seed, those all croaked BUT one produced a 1″ diameter tuber than ended up sprouting. This dude is doing well in the wet, cool weather:

IMG_1982

It’s a lot leggier than the reds I have at work, but we will see how it yields. I started it in 3″ of soil, then added the rest as it grew. I will probably just see how this one fares before going nuts with the potato tower idea.   Work spuds are rocking, the 8 I planted overwintered and came up in April just fine. In fact they are everywhere, so with luck they yield and I can try to finally save ’em in a mini fridge for fall. I plan on packing them in moist dirt at 40 degrees, that seemed to work great last winter.

Garlic

Last summer I had some grocery store garlic that was sprouting, so into the dirt they went. Big hit, they came right up and overwintered and are huge. I’m anxious to see how the bulbs form, it can be hit or miss but they sure look healthy. There’s bunching onions and Valencias mixed in, those all did well too.  The fence is to keep out the rabbits, which ATE THE ONIONS.

Garlic

Seed production

The chives finally bloomed (beautiful purple flowers), I got a small quantity of seed which I’ll fridge for the fall. Oregano and celery are forming, so those ought to be ready soon. I think that was everything I planted, it all went to seed but took 2 years in some cases.

Corn

I have 32 Tophat sweet corn plants at work, I got them in early this year and they are about 2 1/2 feet tall. I’m hoping they will produce fully formed ears, I hit them with shots of nitrogen at sowing and again recently. That seems to the be the key, it definitely made the wheat head out.


Impeller pressed sunflower oil, DIY

Background

With the recent cold and rainy weather, I finally had time to try out making my own sunflower oil. Using the press I built (see the older post on sorghum syrup), I followed the instructions on this site:  http://journeytoforever.org/biofuel_library/oilpress.html

I used oilseed purchased on Amazon, spendy but I got a load of seed for experiments and for fridge saving over a few years. There’s enough to sow a large plot with enough plants to generate a years supply of oil. My biggest issue was pests, mostly finches but also deer and squirrels. Once you have a large enough plot, there’s not enough pests to get the whole thing, assuming you put up a fence to keep the 4-legged critters out. Birds will eat as much immature seed as they possibly can, they are voracious pests so plan on loss unless you can add plastic mesh overhead.

The process

Starting with cleaned black oilseed, use a kitchen blender to shred the whole seeds until it turns into coarse flour. You can only do about a half quart at a time, once the flour forms the whole seeds stop getting to the blade.  Heat the flour up in the oven until it gets to about 150 F, this allows the oil to become less viscous and flow out of the slug inside the press. Don’t be afraid of overheating it, it cools down quickly and you really need a hot press to get the oil out. It will help to preheat the press itself, it will keep the slug warm. You will also want to add heat to the press with a heat gun, to keep it from cooling off.

Load the press full, then compress it by hand to pack as much in as you can. The sleeve will compress 3-4 times in volume, so expect that. You will also need a very large force, I used a 2 ton hydraulic press for the pressure. This was just adequate, the press was binding and at the limit of what I felt comfortable with. Still, it worked very well but could use refinement.

Towards the end of the pressing

I initially got nothing out of the slug, I was thinking “this is a bust” but it finally began flowing out the ports. It took a while, applying heat, cranking the press, and letting it rest. It eventually compacted to an end stage where no additional oil flowed, that’s time to collect and filter the oil.

IMG_1869

The spent slug (turd to some LOL)

Looks like wood ash, but it’s just the flour. It is as hard as a rock, and requires a large screwdriver and mallet to break free from the press sleeve. Lots of people complain about this, the little screw presses are really tough to clean from what I hear. I’m also not sure they generate enough force to clear all the oil from the “cake”.

IMG_1871

Collecting and filtering

I heated the pan, and poured the hot oil into a coffee filter lined funnel on top of a 25 mL graduated cylinder. I wanted to accurately measure the yield, and I got just about 50 mL from a quart of loose seed (not flour). This seems to be about the right yield, looking at reference site’s numbers. It looks great, nice and clear but took overnight to clear the last of the oil through the paper filter. Coffee filter are around 15 microns, this is too small for a gravity filter and especially oil. I will get a 25 micron mesh and see how that goes, I don’t recommend paper for an oil filter unless you pressurize. Next steps are to fry some stuff in the oil, it’s in the fridge waiting for the test. Supposedly oil will turn rancid quickly at room temps, so I’m being cautious.

IMG_1872


Winter time harvest

Wheat Bread

I finally got around to grinding the wheat I grew, then making bread. I used an Oster bread maker, it worked quite well but still needs improvement. I didn’t know about the need to use less yeast and let the dough rise for 3 hours, that avoids the collapsed top common to the heavy wheat flour.  I also skipped the multiple knead/punch/rise steps, I found it’s better to just do a single 12 minute knead and then a slow rise. It makes the loaf a lot lighter. Here’s the result:

IMG_1822

This was a 1.5 lb loaf, as you can see it was pretty decent in terms of the rise and the density although I kick myself for not letting it rise to the top of the pan. I was worried it would collapse, but I don’t think that would have happened.  It tastes great, it was the Oster manual recipe and no complaints about that.  Pretty cool, I went from a handful of seed to actual bread.  I’m out of homegrown wheat, so I am using the Emergency Essentials cans to continue the breadmaking process improvements. I hope to eventually make first class bakery style bread, but this is perfectly acceptable for survival.

Potatoes

Recall the red new potatoes I put in the planter? Well, those grew like mad until Christmas and then died. They did make a fair size crop of new tubers, I was so excited to see the little guys buried in the dirt:

IMG_1819

I boiled these and we ate some with butter and thyme, then the rest fried. They had a very delicate flavor, I’m not a big potato guy but they were as good as the store. Win there too.

Things have settled down now that cold weather is here, not much to do outside just waiting for the last heavy freezes to pass to plant again.  I’ll probably try the wheat bread again, and see how much better I can make it.